Starting at the top of the tree with ROW 1 you will build the tree going down to it's base. Before completing the 7th ROW add the mini lights so the tree can really twinkle. The figures below the instructions will show the tree being assembled as if it were flat. Remember to work with the tree as if it will shape itself.
Note: A few things to remember about working with beads, wire and safety pins: Put a kink in one end of the wire so the beads do not fall off. Always twist firmly so your work is tight. Always keep the safety pins going in the same direction, and go through the loop or the head of the safety pin. not through the body of the pin.
1.Using size 3 safety pins make 75 safety pin assemblies as shown in FIG 2. Assembly # 1 place 3 - 18mm starflakes, 1-8mm faceted, 2-18mm starflakes.
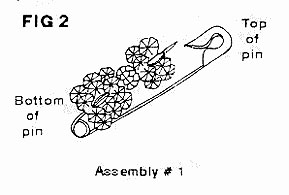 Figure 2
2. Using size 3 safety pins make 25 safety pin assemblies with 4-8mm faceted beads in green on each one. Set these aside until 7th ROW.
3. ROW 1 - Cut a piece of wire 7" long. Thread Safety pins & 6mm faceted beads in the following order, see FIG 3. *1- bottom of safety pin, 1-6mm faceted, repeat from * until you have added 5 safety pins assemblies onto the wire. Close by twisting the wires firmly together. Trim with 1/4" tail and bend twist toward center.
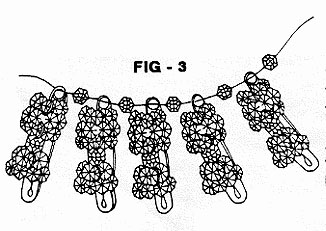 Figure 3
ROW 2 - Cut a piece of wire 12" long. Thread safety pins and 8mm faceted beads in the following order, see FIG 4. ** top of pin from 1st row, bottom of new pin, 1 - 8mm faceted, bottom of new pin, repeat from ** until you have added 10 safety pin assemblies onto the wire. Close by twisting the wires firmly together. Trim with 1/4" tail and bend twist toward center.
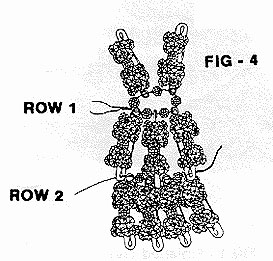 Figure 4
ROW 3 - Cut a piece of wire 15" long. Thread safety pins and 8mm faceted beads in the following order, see FIG 6. *** top of pin from 2nd row, bottom of new pin, 1 - 8mm faceted, bottom of new pin, top of pin from 2nd row, 1 - 8mm faceted, bottom of new pin, 1 - 8mm faceted, repeat from *** until you have added 15 safety pin assemblies onto the wire. Close by twisting the wires firmly together. Trim with 1/4" tail and bend twist toward center.
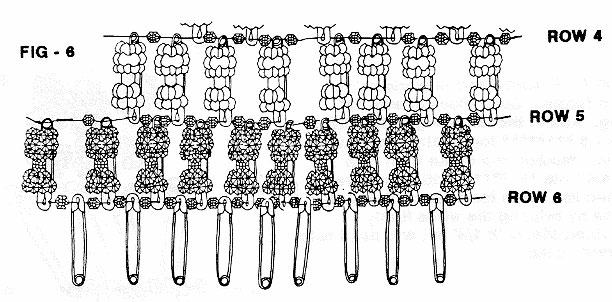 Figure 6
// Remember to let the tree shape itself and to always keep your work as tight as possible without breaking the wire. //
ROW 4 - Cut a piece of wire 18" long. Thread safety pins & 8mm faceted beads in the following order, see FIG 5. **** top of pin from 3rd row, bottom of new pin, 1 - 8mm faceted, bottom of new pin, top of pin from 3rd row, 1 - 8mm faceted, bottom of new pin, 1 - 8mm faceted, top of pin from 3rd row, 1 - 8mm faceted, bottom of new pin, 1 - 8mm faceted, repeat from **** unto you have added 20 safety pin assemblies onto the wire. Close by twisting the wires firmly together. Trim with 1/4" tail and bend twist toward center.
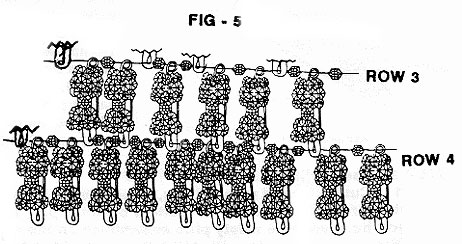 Figure 5
ROW 5 - Cut a piece of wire 24" long. Thread safety pins and 8mm faceted beads in the following order, see FIG 6 above. ***** top of pin from 4th row, bottom of new pin, 1 - 8mm faceted, bottom of new pin, top of pin from 4th row, 1 - 8mm faceted, bottom of new pin, 1 - 8mm faceted, top of pin from 4th row, 1 - 8mm faceted, bottom of new pin, 1 - 8mm faceted, top if pin from 4th row, 1 - 8mm faceted, bottom of new pin, 1 - 8mm faceted, repeat from ***** until you have added 25 safety pin assemblies onto the wire. Close by twisting the wires firmly together. Trim with 1/4" tail and bend twist toward center.
ROW 6 - Cut wire 28". These are 25 plain safety pins with NO beads on them. Add to the tree in the following order, see FIG 6. ****** Top of pin from row 5, 1 - 8mm faceted, top of new pin, 1 - 8mm faceted, repeat from ****** until you have added 25 safety pins onto the wire. Close by twisting the wires firmly together. Trim with 1/4" tail and bend twist toward center.
ROW 7 - Cut a piece of wire 28" long. Using assembly #2 the ones we set aside when we started. These have 4-8mm faceted beads on each safety pin. Add to the tree in the following order, see FIG 7. ******* Bottom of pin from Row 6, 1 - 8mm faceted, bottom of assembly #2 safety pin, repeat from ******* until you have added 25 safety pin assemblies onto the wire. Add mini lights now. Turn tree on it's side, make certain 1 light is all the way to the top of the tree. Allow the plug to dangle between the last two safety pins in this row. Close by twisting the wires firmly together. Trim with 1/4" tail and bend twist toward center.
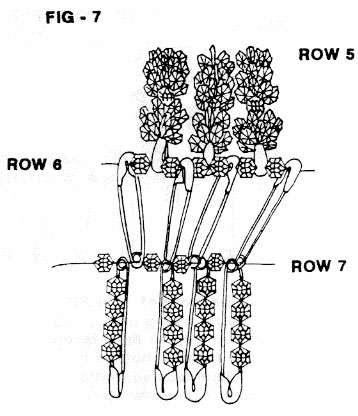 Figure 7
ROW 8 - The final row is made using 8mm faceted. Cut a piece of wire 12" long. Add in the following order, see FIG 8. ******** top of pin from Row 7, 1 - 8mm faceted, top of pin from Row 7, repeat from ******** until you have added 25 - 8mm faceted beads onto the wire. Close by twisting the wires firmly together. Trim with 1/4" tail and bend twist toward center.
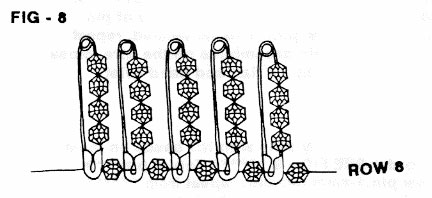 Figure 8
 Figure 9
Plug in your Twinkle Tree and watch it sparkle.